.
May - 2014
Resources for getting started with Robofont
→ When getting started working with the type design application Robofont I recommend to check out the links and downloads that I compiled below. This is a list that I prepared for my students but I think anyone new to Robofont might find some of these basic pointers useful. Please don't hesitate to suggest changes or additions. And now have fun…

- Robofont
- Preferences
- Extensions
- Documentation
- Using the Transform Box
- Modifier keys for drafting
- Trouble shooting
- Starting points for your project
- References for advanced trickery
Software
Robofont
The first step would be to download the application and copy it into your application folder. A free 30 day evaluation copy can be found here: If you decide to purchase a license or if I supply you with an academic (extended trial) license during class here is how you activate Robofont: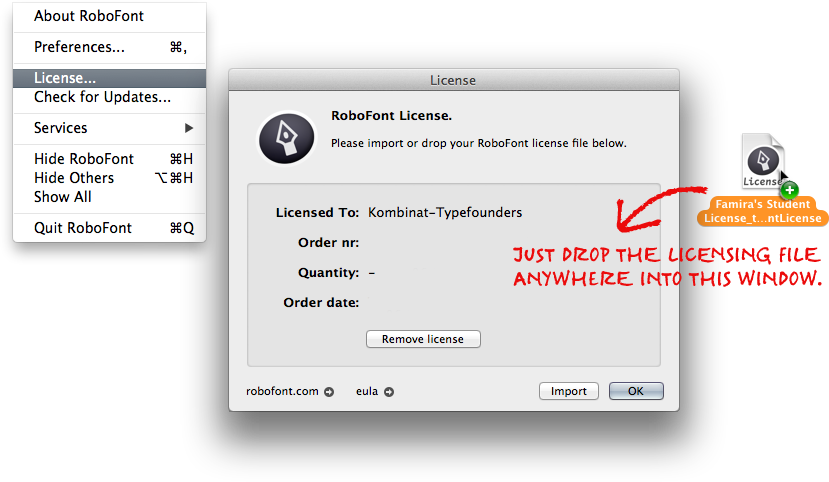
- unzip the license file and keep it handy
- start Robofont
- in Robofont select from the menu bar the menu called Robofont
- choose the menu item License…
- drag and drop the unzipped license document onto the Robofont License window
Preferences
Here are my own preferences; this is how I like to work. I think this is a good starting point but please change whatever you feel makes best sense for you. Robofont is giving the user an unprecedented amount of options to personalize the user experience. Download, unzip and import: You can import the preferences file by clicking the little gear button at the bottom left in your preferences window (command-comma). After making any changes to the preferences don't forget to hit the "Apply" button on the top right of the Preferences window. This and much more is described in the online documentation on the Robofont website.Robofont Extensions
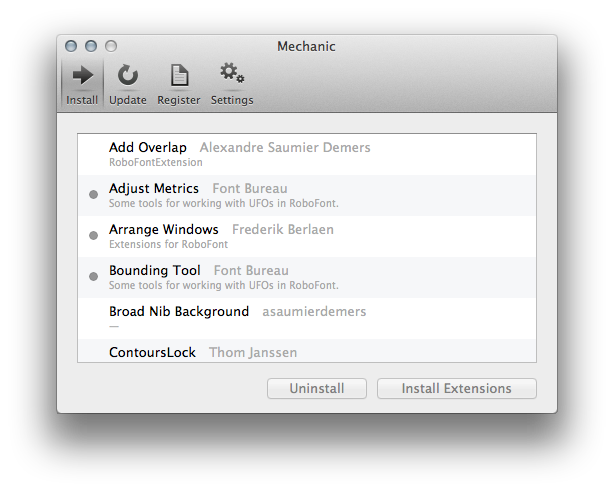
Then there are a number of extensions and plug-ins that I highly recommend. First and foremost is the Mechanic extension by Jack Jennings: Once it is installed this wonderful thing will automatically access the Github website, track down all other Robofont extensions and make their installation process super simple. I recommend that you select Mechanic from the Extensions menu and use it to install the following extensions:- Adjust Metrics
- Arrange Windows
- Add Overlap
- Batch
- DesignSpace Editor
- Feature Preview
- Glyph Construction
- Rotator
- Scaling Edit Tool
- Shape Tool
- Suffixer
- Touché
- Outliner
- Underline Strikethrough
Additionally I am using one custom made Python script, graciously made available to us by Frederik Berlaen. You can download it here: After you finished downloading place the document (ApplyCharacterset.py) in the directory outlined below. In the Finder hold down the option-key (alt) while selecting the Go menu from the menu bar. This will give you access your Library folder:
Library / Application Support / Robofont / Scripts
James Edmondson has a Tumbler where he keeps track of the coolest Robofont Extensions:
Manuals
Documentation
Some things just need to be watched or read once to clear things up. Others are handy to refer back to. The Robofont website has a pretty easy to understand and quite complete online manual. This is a good starting point:Vimeo
There are also a number of videos on the Vimeo website, demonstrating single steps in the workflow:Using the Transform Box
With different modifier keys the transform box allows different actions. Those I have found handy to check back with every now and then. Find a list here:Modifier Keys for Drafting
Robofont has numerous modifier keys that make advanced outline drawing and editing possible. Download a cheat sheet in PDF format:Trouble shooting
If something goes horribly wrong there is a forum:Starting points for your project
Scan
If you don't have a scan of your own drawings handy please feel free to use these (they were the first sketches for my typeface Arouet). The quality is quite terrible but you will see why this is actually a good thing:FontLab document
If you are a recent convert, switching from FontLab use this Python script to export your VFB source file in UFO format. It is called "UFO-Central" and can be downloaded for free here: After you finished downloading place the document (UFOCentral.py) in the directory outlined below. In the Finder hold down the option-key (alt) while selecting from the menu bar the Go menu. This will give you access your Library folder:Library / Application Support / FontLab / Studio 5 / Macros
Then restart FontLab and select UFO-Central from the Scripts or Macro menu.
References for advanced trickery
OpenType layout features
If you want to learn how to write OT Features I can’t recommend enough Andy Clymer's Font Production Workshop at the Type@Cooper Program. If you want to give it a try by yourself here are two reference pages on the Adobe website:- Microsoft OT feature registry, a list of all available feature tags
- Adobe OT feature syntax, these are the rules for writing OpenType features
- Tal Lemming's OpenType Feature Cookbook, a didactic tool for approaching Feature code.
- Martin Wenzel's Introduction to OpenType Features on I Love Typography.
Interpolation calculator
When you have a Bold and a Light master there are several ways to calculate in-between steps for say, Book, Medium and SemiBold styles. There are a number of online calculators:- http://www.iro.umontreal.ca/~boyer/typophile/interpolation.html
- http://www.impallari.com/familysteps/index.php
Letter and word frequency in the English language
Third party applications
Robofont likes company
These programs are designed to work particularly well in concert with Robofont. Once they are installed Robofont will become aware of them and offer round-trip editing from the font window’s tool bar. They are specialized on discreet tasks for a truly pro-level workflow:- MetricsMachine, specialized on professional kerning
- Prepolator, the tedious task of preparing multiple source files and rendering them compatible for interpolation becomes easy
- Superpolator, for inter- or extrapolating font styles (instances) between multiple font masters along multiple interpolation axes
- UFOstretch, from compatible masters create user defined sets of characters with intricate, compounded manipulations (scale, skew, space, shift, interpolate… and all of this with independent x and y axes)